レッスン1:Building Your First App(2)
引き続き、開発トレーニング。

続くレッスンは、Android Studioで作成しているアプリを実行してみる方法について
なんですが、前半の実機を使ったアプリの実行については、すでにメモしてあるので、こちらを参照ください。
メモ:実機を使ってデバッグするのに準備が必要だったので - Mono Works
Android Virtual Device(AVD)というエミュレータを使ったアプリの実行についても、AVD作成後の手順は、実機の代わりにAVDを選択するだけです。AVDの作成は、メニュー[Tools] > [Android] > [AVD Manager]を選択して、AVD Managerメイン画面の「Create Virtuarl Device」をクリックして、テスト対象の環境を指示に従って選択していくだけなので、「アプリの実行」については、以上で終了とします。
続いてのトレーニングは、シンプルなUI(ユーザーインターフェース)の作り方です。
簡単なユーザー インターフェースの作成 | Android Developers
シンプルUIの構築(前説)
このレッスンでは、XMLにテキストフィールド(テキスト入力欄)とボタンを含むレイアウトを作成します。
AndroidアプリのグラフィカルUIは、ViewとViewGroupオブジェクトの階層を使って構築されます。Viewオブジェクトは、ボタンやテキストフィールドといったUIウィジェットが使われます。ViewGroupオブジェクトは、グリッドや縦並びのリストのように、子ビューの配置方法を定義するビューの容れ物です。
Androidでは、ViewやViewGroupのサブクラスに対応するXMLボキャブラリが提供されます。つまりUI要素の階層を使ってXMLにUIを定義できるのです。
シンプルUIの構築(LinearLayoutの作成)
前回のトレーニングで作成した「My First App」プロジェクトに手を加えていきます。
- デフォルトのレイアウトファイル(res/layout/activity_my.xml)をText編集モードで見ると、RelativeLayoutビューの中に子ビューの TextViewが入っています
- Preview画面を非表示にする方法は省略
- TextView要素を削除して
- RelativeLayout要素をLinearLayoutに変更
- LinearLayoutにandroid:orientation属性を追加して「horizontal」をセット
- LinearLayoutからandroid:padding属性とtools:context属性を削除
以上の作業で、デフォルトのレイアウトファイル(activity_my.xml)は、こうなります。
変更前
<RelativeLayout
    xmlns:android="http://schemas.android.com/apk/res/android"
    xmlns:tools="http://schemas.android.com/tools"
    android:layout_width="match_parent"
    android:layout_height="match_parent"
    android:paddingLeft="@dimen/activity_horizontal_margin"
    android:paddingRight="@dimen/activity_horizontal_margin"
    android:paddingTop="@dimen/activity_vertical_margin"
    android:paddingBottom="@dimen/activity_vertical_margin"
    tools:context=".MainActivity">

    <TextView
        android:text="@string/hello_world"
        android:layout_width="wrap_content"
        android:layout_height="wrap_content"/>

</RelativeLayout>
変更後
<LinearLayout
    xmlns:android="http://schemas.android.com/apk/res/android"
    xmlns:tools="http://schemas.android.com/tools"
    android:layout_width="match_parent"
    android:layout_height="match_parent"
    android:orientation="horizontal">

</LinearLayout>
LinearLayoutは、子ビューを縦または横一列に配置するビューグループのひとつ(ViewGroupのサブクラス)です。配置を縦一列(vertical)にするか横一列(horizontal)にするかは、android:orientation属性で指定します。また、LinearLayoutの中に記述された子ビューは、XMLに記述された順番どおりに実際の画面に表示されます。LinearLayoutと RelativeLayoutの詳細は、下記メモを参照ください。
メモ:ビューの配置 - LinearLayout と RelativeLayout - Mono Works
ビューのサイズを決定するための android:layout_width属性と android:layout_height属性、そして、そこにセットした値の「match_parent」などについては、下記メモを参照ください。次の作業で出てくる「wrap_content」についても書いています。
メモ:アプリのレイアウト(Viewの幅と高さの指定) - Mono Works
シンプルUIの構築(Text Fieldの追加)
テキストを入力する場所を提供する EditTextオブジェクトを配置します。
- レイアウトファイル(activity_my.xml)に記述した LinearLayout要素の中に id属性として「@+id/edit_message」をセットした EditText要素を定義
- layout_width属性と layout_height属性に「wrap_content」をセット
- android:hint属性に「edit_message」という名の文字列オブジェクトをセット
以上の作業で、res/layout/activity_my.xmlファイルはこうなります。
<LinearLayout
    xmlns:android="http://schemas.android.com/apk/res/android"
    xmlns:tools="http://schemas.android.com/tools"
    android:layout_width="match_parent"
    android:layout_height="match_parent"
    android:orientation="horizontal">

    <EditText
        android:id="@+id/edit_message"
        android:layout_width="wrap_content"
        android:layout_height="wrap_content"
        android:hint="@string/edit_massage"/>

</LinearLayout>
android:id属性について
この属性は、ビューを特定するために付けられる識別子です。アプリの実行コードからオブジェクトを読み込んだり、操作する場合に、そのオブジェクトを参照するための目印となります。
値の先頭に付く「@」は、XMLから別リソースのオブジェクトを参照する時に必要です。「@」の後ろにリソースのタイプ(このレッスンでは「id」)、その後ろに「/」を付けてリソース名(このレッスンでは「edit_message」)を記述します。リソースタイプの前に付いた「+」については、下記メモを参照ください。
メモ:「id="@+id/名前"」という構文について - Mono Works
android:hint属性について
デフォルトでは、テキスト入力エリアは空白です。この入力欄に「@string/edit_massage」で定義された内容を入力欄のヒントとして表示するための属性です。@stringを使ったテキスト参照については、下記メモをどうぞ。
メモ:Android Studioの要素の参照先表示が便利 - Mono Works
シンプルUIの構築(Stringリソースの追加)
Androidのプロジェクトにデフォルトで含まれる文字列リソース(res/values/strings.xml)に参照するテキストを追加します。
- 文字列リソース(res/values/strings.xml)を開きます
- string nameを1行追加して「edit_message」という名前で、値に「Enter a message」をセット
- string nameを1行追加して「button_send」という名前で、値に「Send」をセット
- string nameが「hello_world」の行を削除
以上の作業で、res/values/strings.xmlファイルはこうなります。
<resources>
    <string name="app_name">My First App</string>

    <string name="action_settings">Settings</string>
    <string name="edit_message">Enter a message</string>
    <string name="button_send">Sned</string>
</resources>
シンプルUIの構築(ボタンの追加)
- レイアウトファイル(res/layout/activity_my.xml)を開きます
- LinearLayout要素の中の EditText要素の直下に Button要素を定義
- Button要素の widthと heightに「wrap_content」をセット
- ボタン表面に表示する文字列を android:text属性に定義して「button_send」をセット
以上の作業で、res/layout/activity_my.xmlファイルはこうなります。
<LinearLayout
    xmlns:android="http://schemas.android.com/apk/res/android"
    xmlns:tools="http://schemas.android.com/tools"
    android:layout_width="match_parent"
    android:layout_height="match_parent"
    android:orientation="horizontal">

    <EditText
        android:id="@+id/edit_message"
        android:layout_width="wrap_content"
        android:layout_height="wrap_content"
        android:hint="@string/edit_message"/>
    <Button
        android:layout_width="wrap_content"
        android:layout_height="wrap_content"
        android:text="@string/button_send"/>

</LinearLayout>
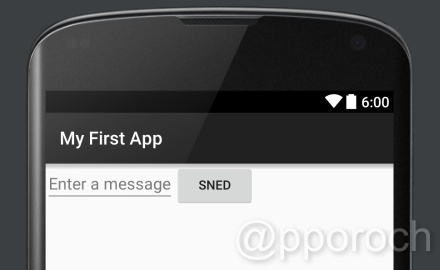
ここまでの作業で、テキスト入力欄のビューとボタンビューが横一列(horizontal)に並び、各ビューの幅と高さは表示内容に合わせて適度な大きさ(wrap_content)で表示されます。
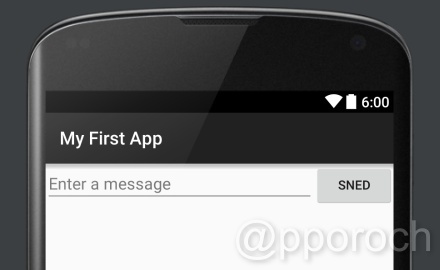
シンプルUIの構築(テキスト入力欄を余白いっぱいに表示させる)
このセクションの詳細については、下記メモを参照ください。
メモ:余白の配分(layout_weightについて) - Mono Works
実際の作業は以下のとおり。
- レイアウトファイル(res/layout/activity_my.xml)のEditText要素に layout_weight属性を追加して「1」をセット
- EditText要素の layout_width属性の値を「0dp」に変更
以上の作業で、res/layout/activity_my.xmlファイルはこうなります。
<LinearLayout
    xmlns:android="http://schemas.android.com/apk/res/android"
    xmlns:tools="http://schemas.android.com/tools"
    android:layout_width="match_parent"
    android:layout_height="match_parent"
    android:orientation="horizontal">

    <EditText
        android:id="@+id/edit_message"
        android:layout_weight="1"
        android:layout_width="0dp"
        android:layout_height="wrap_content"
        android:hint="@string/edit_message"/>
    <Button
        android:layout_width="wrap_content"
        android:layout_height="wrap_content"
        android:text="@string/button_send"/>

</LinearLayout>
この作業で、ボタンビューのサイズがそのままで、横幅の残りいっぱいにテキスト入力欄が広がって表示されるようになりました。
次回レッスンについて
今回のレッスンでは、アプリのメイン画面にテキスト入力欄とボタンを配置しました。そして、次回のレッスンでは、このボタンが押された時に、テキストフィールドに入力された内容を次のactivityへ渡す動作をアプリに設定する方法などについてトレーニングします。
【参考サイト】

コメント
コメントなどありましたら、GitHubのディスカッションへお願いします。(書き込みには、GitHubのアカウントが必要です)