ぼちぼちサンプルを作りつつ、Androidさんと戯れているわけですが、今回もレイアウトに関するメモをひとつ。
タイトルに掲げた「layout_weight」は、レイアウトとして余った部分をどう割り振るかを「Weight(重み)」で決めるための属性です。なんとなく文章で説明するのが面倒だったので、どんな設定をおこなうと、どんな風に画面が表示されるのかを具体的に示します。
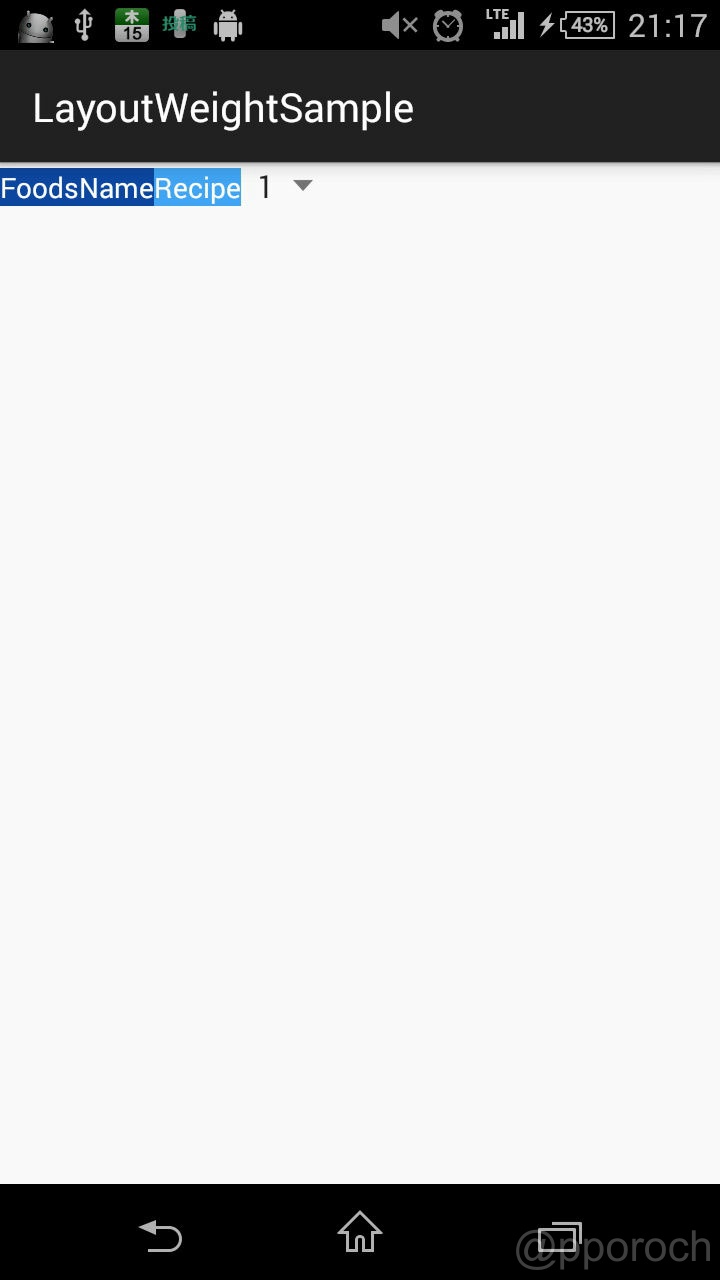
wrap_contentのみで必要最小限の横幅を確保した3つのビュー
最初に、3つのビュー(テキストビュー2つとSpinnerビュー1つ)すべてをlayout_width="wrap_content"で並べたレイアウト。
activity_main.xml
<LinearLayout xmlns:android="http://schemas.android.com/apk/res/android"
                android:layout_width="match_parent"
                android:layout_height="match_parent"
                android:orientation="horizontal">

    <TextView
        android:text="@string/foods"
        android:textColor="@color/blue900"
        android:layout_width="wrap_content"
        android:layout_height="wrap_content"/>

    <TextView
        android:text="@string/recipes"
        android:textColor="@color/blue400"
        android:layout_width="wrap_content"
        android:layout_height="wrap_content"/>

    <Spinner
        android:layout_width="wrap_content"
        android:layout_height="wrap_content"
        android:entries="@array/ingredients_quantity"/>

</LinearLayout>
分かりやすくするため、テキストビューの背景色と文字色を設定しました。
colors.xml
<?xml version="1.0" encoding="utf-8"?>
<resources>
    <color name="blue900">#0D47A1</color>
    <color name="blue400">#42A5F5</color>
    <color name="white">#FFFFFF</color>
</resources>すべてのビューがすべてlayout_width="wrap_content"で文字幅分ずつ幅を確保しているので、画面はこんな感じで表示されます。
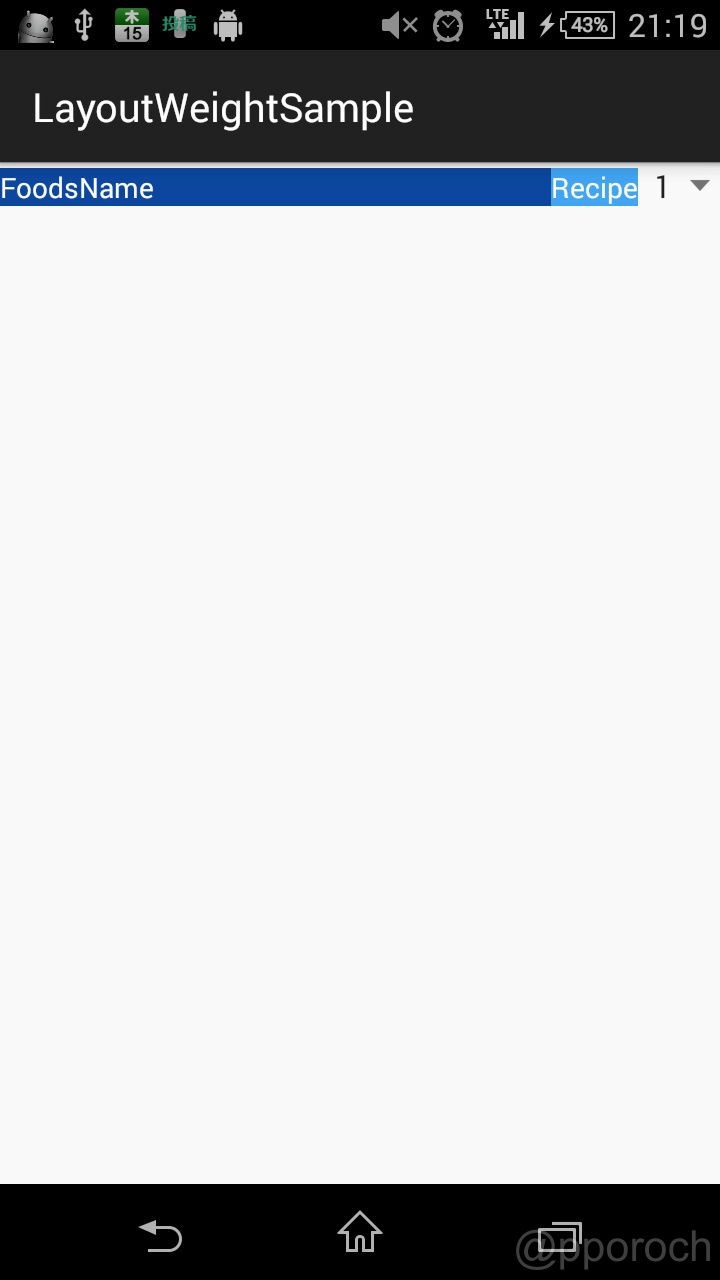
先頭のビューのみlayout_weight要素を適用した並び
続いて、先頭ビューの「foods」にlayout_weightに「1」を設定。この時、layout_widthは「0dp」に設定。
activity_main.xml
<LinearLayout xmlns:android="http://schemas.android.com/apk/res/android"
                android:layout_width="match_parent"
                android:layout_height="match_parent"
                android:orientation="horizontal">

    <TextView
        android:text="@string/foods"
        android:background="@color/blue900"
        android:textColor="@color/white"
        android:layout_weight="1"
        android:layout_width="0dp"
        android:layout_height="wrap_content"/>

    <TextView
        android:text="@string/recipes"
        android:background="@color/blue400"
        android:textColor="@color/white"
        android:layout_width="wrap_content"
        android:layout_height="wrap_content"/>

    <Spinner
        android:layout_width="wrap_content"
        android:layout_height="wrap_content"
        android:entries="@array/ingredients_quantity"/>

</LinearLayout>layout_weightを設定していない二番目と三番目のビューは、layout_weight="0"を設定しているとみなされ、文字幅分だけの幅を確保します。そして、残った幅を先頭ビューの「foods」が占有するので、画面は、こんな感じに表示されます。
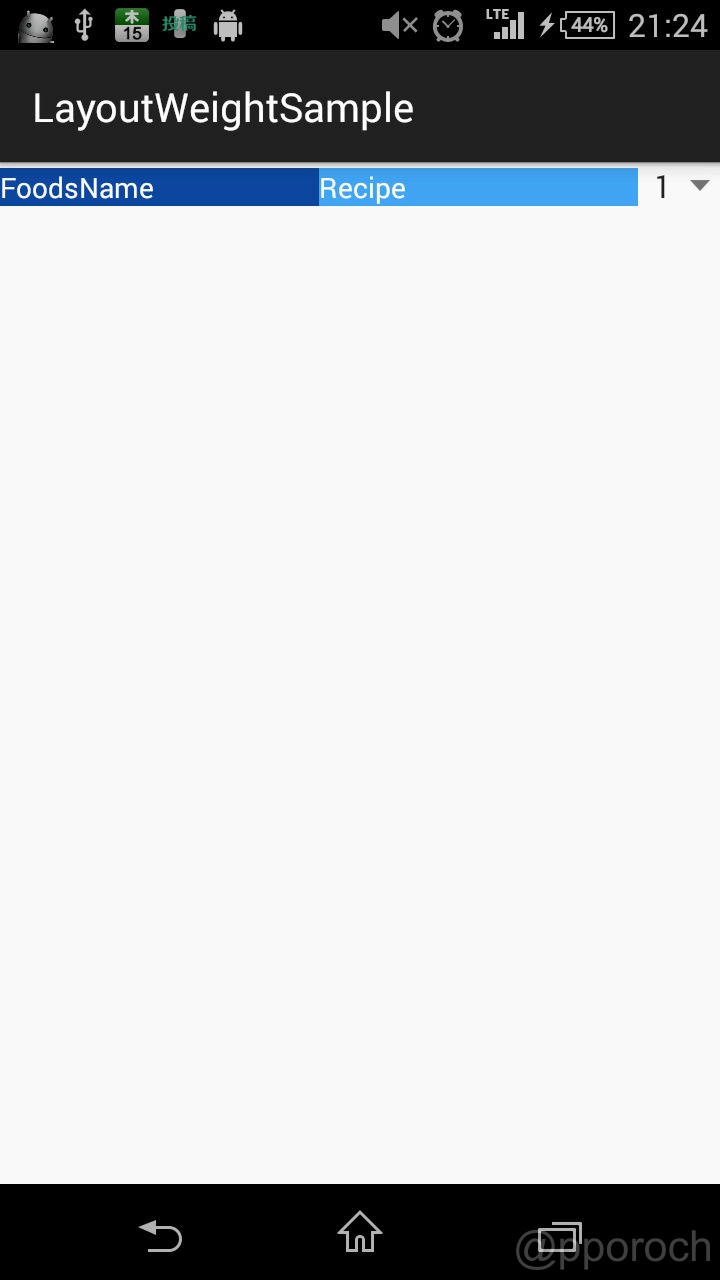
先頭と二番目のビューにlayout_weight要素を適用した並び
次に、先頭と二番目のビューに、それぞれlayout_weightに「1」とlayout_widthに「0dp」を設定したケース。
activity_main.xml
<LinearLayout xmlns:android="http://schemas.android.com/apk/res/android"
                android:layout_width="match_parent"
                android:layout_height="match_parent"
                android:orientation="horizontal">

    <TextView
        android:text="@string/foods"
        android:background="@color/blue900"
        android:textColor="@color/white"
        android:layout_weight="1"
        android:layout_width="0dp"
        android:layout_height="wrap_content"/>

    <TextView
        android:text="@string/recipes"
        android:background="@color/blue400"
        android:textColor="@color/white"
        android:layout_weight="1"
        android:layout_width="0dp"
        android:layout_height="wrap_content"/>

    <Spinner
        android:layout_width="wrap_content"
        android:layout_height="wrap_content"
        android:entries="@array/ingredients_quantity"/>

</LinearLayout>layout_weightを設定していない最後のビューのみlayout_weight="0"を設定しているとみなされ、文字幅分だけの幅を確保します。そして、残った幅を先頭と二番目ビューが占有。どちらもlayout_weight="1"なので、残りの幅を1:1のWeight(重み)で分割するので、画面はこんな感じになります。
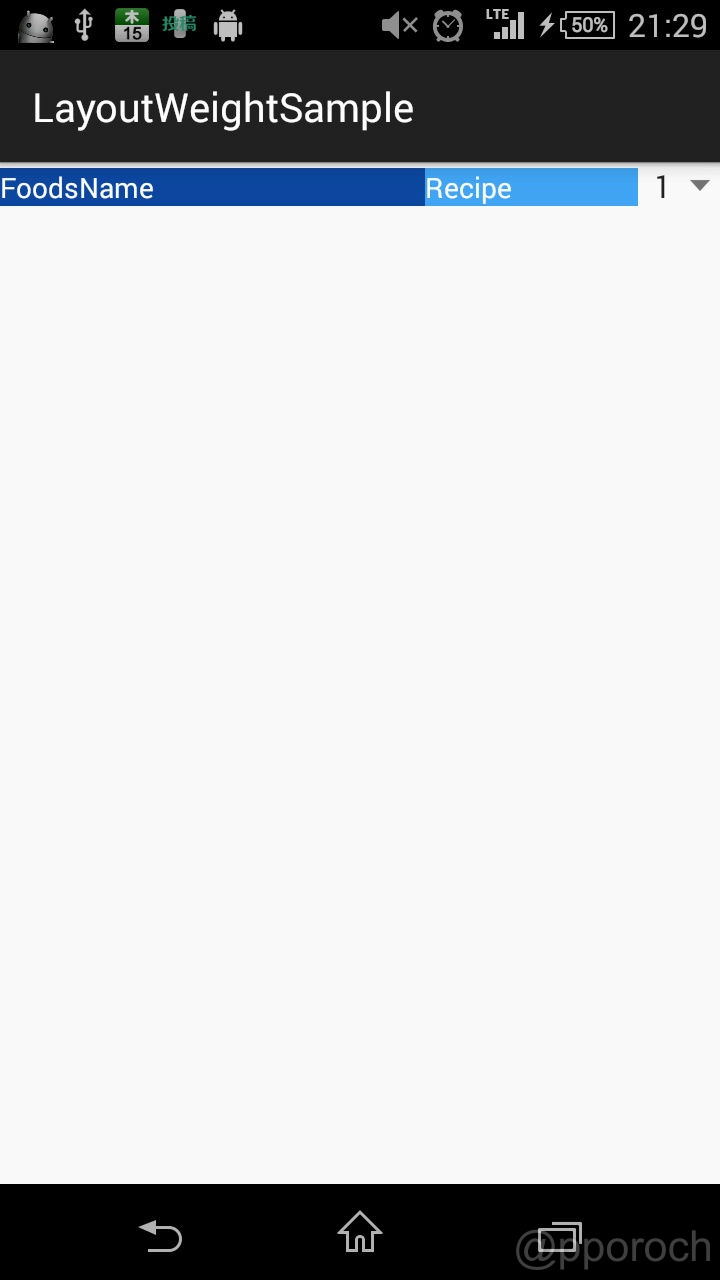
先頭と二番目の重み(比率)を変えてみると
最後の例では、先頭ビューのlayout_weightを「2」に、二番目のビューのlayout_weightを「1」を設定したケース。
activity_main.xml
<LinearLayout xmlns:android="http://schemas.android.com/apk/res/android"
                android:layout_width="match_parent"
                android:layout_height="match_parent"
                android:orientation="horizontal">

    <TextView
        android:text="@string/foods"
        android:background="@color/blue900"
        android:textColor="@color/white"
        android:layout_weight="2"
        android:layout_width="0dp"
        android:layout_height="wrap_content"/>

    <TextView
        android:text="@string/recipes"
        android:background="@color/blue400"
        android:textColor="@color/white"
        android:layout_weight="1"
        android:layout_width="0dp"
        android:layout_height="wrap_content"/>

    <Spinner
        android:layout_width="wrap_content"
        android:layout_height="wrap_content"
        android:entries="@array/ingredients_quantity"/>

</LinearLayout>
三番目のSpinnerビューが文字幅分だけ幅を確保します。そして、残った幅を先頭と二番目のテキストビューが2:1の重みで占有するので、画面はこんな感じになります。
まとめ
layout_weight属性を使うと、それぞれに具体的な幅を設定しなくても、重み(比率)で幅を確保してくれます。ポイントは2つ。
- 「
layout_weightを設定しない」もしくは「layout_weight="0"を設定した」ビューは必要最小限の幅を確保して、残った幅を重み(比率)を設定したビューで割り振る layout_weightで重みを指定したビューは、layout_width="0dp"(幅の指定を0dp)とする
今回は、ビューを横に並べて「幅」を設定する例を示しましたが、もちろんビューを縦に並べて「高さ」を割り振ることもできます。また、さらっと流してましたが、Spinnerビュー(ドロップダウンリスト)については、次回メモの予定。
【参考サイト】


コメント
コメントなどありましたら、GitHubのディスカッションへお願いします。(書き込みには、GitHubのアカウントが必要です)